Remember I talked about having limited resources available in mobile apps? That means we can’t just stuff all our data into a massive scroll view and hope it works. (Websites are notorious for doing just that. To make it work, your phone kills most non-essential processes when you open those websites.)
The solution is to make it look like we have an infinite list of things to display. We do this by making views only for the list items currently onscreen. When you scroll down, the View that disappears off the top of the screen is re-used to display something else, and is added just below the bottom of the screen.
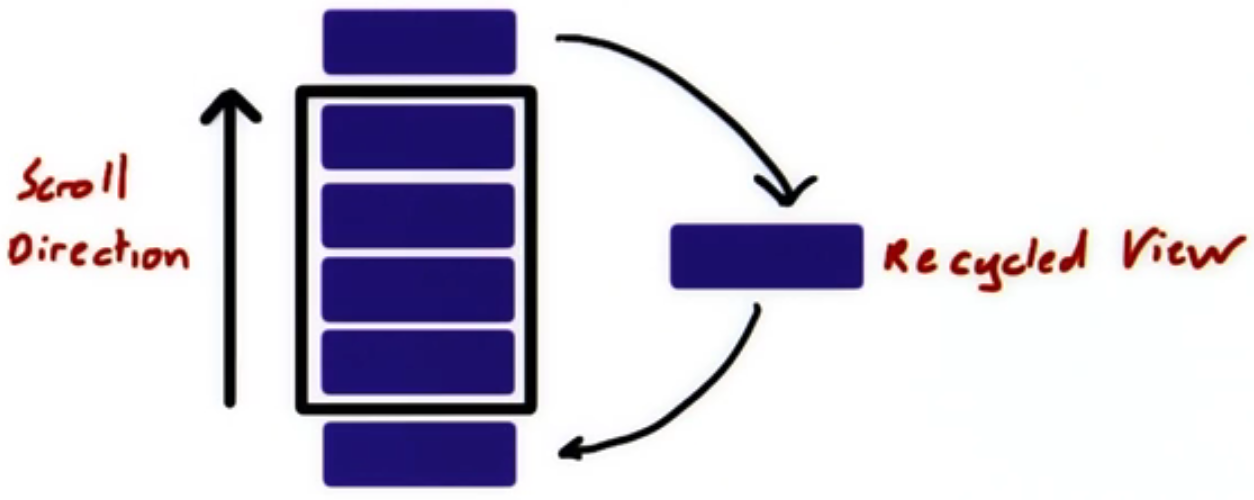
In Android, RecyclerView does all the crazy logic needed to make this work efficiently. All we need to do is to provide views whenever RecyclerView needs them, and update them to display new items when asked to. There’s a bit of code we need to write, but it’s not too complicated. The performance gain is easily worth it if you have more than 15-20 items to display.
- Right-click on the
appmodule in the project overview on the left and select New → Activity → Empty Activity.- Name it
ListActivity - Source language should be Kotlin
- Check the box that says “Launcher Activity” (this makes a home screen icon the for activity)
- Name it
- In our new layout file (mine is called
activity_list.xml), drag aRecyclerViewinto the layout designer. - When asked, yes, you add the
RecyclerViewlibrary to Gradle. If it doesn’t ask, add this in thedependenciessection ofGradle scripts/build.gradle (Module: app):``` implementation ‘com.android.support:recyclerview-v7:27.1.0’ - Add constraints to all edges of the screen. Remember, you add constraints by grabbing the handles on the sides of our view, and dragging “springs” to the corresponding edge of the screen.
- Remove any margins (using the Attributes panel), and set both width and height to
match_constraint(if that doesn’t work, try0dp). - Give the recycler view an ID, for example
recyclerView.
But what are we going to display?? “Item0/Item1/…” isn’t particularly exiting…
-
Right-click our
resfolder and select New Android Resrouce File. -
Set the following:
- File name:
item_deadline.xml - Resource type: Layout
- Root element:
android.support.constraint.ConstraintLayout - Source set: main
- Directory name: layout
- File name:
-
Re-create our scene with the text, grim reaper and computer guy. If you don’t feel like doing it all over again, switch to “Text” view using the button at the bottom and paste this:```
<android.support.constraint.ConstraintLayout xmlns:android=“http://schemas.android.com/apk/res/android" xmlns:app=“http://schemas.android.com/apk/res-auto" android:layout_width=“match_parent” android:layout_height=“140dp”>
<TextView
    android:id="@+id/hoursLeftTextView"
    android:layout\_width="wrap\_content"
    android:layout\_height="wrap\_content"
    android:layout\_marginBottom="8dp"
    android:layout\_marginRight="8dp"
    android:text="Hello World!"
    android:textAppearance="@style/TextAppearance.AppCompat.Headline"
    app:layout\_constraintBottom\_toBottomOf="parent"
    app:layout\_constraintRight\_toRightOf="parent" />

<ImageView
    android:id="@+id/userImageView"
    android:layout\_width="wrap\_content"
    android:layout\_height="wrap\_content"
    android:layout\_marginEnd="8dp"
    android:layout\_marginTop="8dp"
    app:layout\_constraintBottom\_toTopOf="@+id/hoursLeftTextView"
    app:layout\_constraintEnd\_toEndOf="parent"
    app:layout\_constraintTop\_toTopOf="parent"
    app:srcCompat="@drawable/ic\_computer\_work" />

<ImageView
    android:id="@+id/reaperImageView"
    android:layout\_width="wrap\_content"
    android:layout\_height="wrap\_content"
    android:layout\_marginEnd="54dp"
    android:layout\_marginTop="8dp"
    app:layout\_constraintBottom\_toBottomOf="@+id/userImageView"
    app:layout\_constraintEnd\_toEndOf="@+id/userImageView"
    app:layout\_constraintTop\_toTopOf="@+id/userImageView"
    app:srcCompat="@drawable/ic\_grim\_reaper" />
</android.support.constraint.ConstraintLayout>
In our code, we need to write three classes:
Deadline– Contains the deadline date and nameDeadlineViewHolder– Wrapper around an item view, takes care of switching out the contents whenever the view should display a different item.DeadlineAdapter– Create views and coordinate updates
Let’s start with the simplest one:
- Create a new Kotlin class called
Deadline:``` data class Deadline(var title: String, val date: Date) {} - Copy our
getHoursLeft()method into this class. (Make sure you get the variable names right.)
Hopefully not too bad? Let’s try the next one:
- Create a new Kotlin class called
DeadlineViewHolder. - It should take one constructor parameter:
view: View. - Extend
RecyclerView.ViewHolder.- Remember Kotlin uses
:instead ofextends - You need to call the constructor right away. It takes a
View, wonder which one…?
- Remember Kotlin uses
Before we finish the view holder, we need to understand how it will be used. So let’s create the adapter which will use the view holder:
Note: this section can be a bit overwhelming if you’re not used to this kind of programming. If you get stuck, look at what variables and methods you have available in the code you’re writing and what you need to end up with (the return value).
- Create a new Kotlin class called
DeadlineAdapter. - Make it extend
RecyclerView.Adapter<DeadlineViewHolder>Hint: Remember the thing with the colon and the constructor call. - There will be a red line telling you that you need to implement some methods. Click the text with the red line, hit
Alt+Enterand select “Implement methods”. This should give you three methods you need to implement, press OK to add them.- As you see, we need to create views (more precisely, view holders), bind them (=make them display our items), and tell
RecyclerViewhow many items we have.
- As you see, we need to create views (more precisely, view holders), bind them (=make them display our items), and tell
- We don’t have any items yet, so declare a mutable property (same as “field” in Java) called
itemsand initialize it to an empty list. - When this list changes, we need to tell
RecyclerViewabout it. The easiest way to do that, is to create a setter. Kotlin has a special syntax for that:``` var items: List = emptyList() set(value) { notifyDataSetChanged() // Tell RecyclerView we got some new data field = value // Put the value we got into the field } - Implement
getItemCount. Hint: it’s a one-liner. You should be able to figure it out on your own. onCreateViewHolderis more interesting. We need to parseitem_deadline.xmland turn it into views somehow. In Android, this is called inflating the layout, and we do it using a layout inflater:// Fetch a layout inflater val layoutInflater = LayoutInflater.from(parent.context) // Read the layout for each item from the item\_deadline file. // (Don't attach it, RecyclerView takes care of that) val view = layoutInflater.inflate(R.layout.item\_deadline, parent, false)Hint: If you read the method header, you see that we should return aDeadlineViewHolder, not aView. Remember what argument theDeadlineViewHolderconstructor takes? Hmm…- The last method is
onBindViewHolder. It gives us aviewHolder, and apositionin the list. What we need to do is to fetch the corresponding deadline from the list of items, and give it to the view holder. Of course, this means that we need to add a method to theviewHolderthat takes aDeadlineobject, let’s name itbind:``` viewHolder.bind(deadline) - Click the red
bindmethod call, pressAlt+Enterand “Create member function” to create the method.
Still following? Let’s finish up our DeadlineViewHolder class now that we know where it will be called:
- At the top, just below the class name, create references to our views. Kotlin’s magic doesn’t work here, so we need to use
findViewByIdmanually like this:val hoursLeftTextView: TextView = view.findViewById(R.id.hoursLeftTextView)Do the same forreaperImageView. - We have our empty
bind(deadline: Deadline)method. This method should do essentially the same thing asupdateUI()inMainActivity, so copy the contents of that method in here. - Update the code to use number of hours left from the
Deadlineobject. - Make our
hoursLeftTextViewdisplay thetitleof the deadline too.
Now we have everything we need to display a large list! All we need to do is to actually put some items in it and display it:
- Go to
ListActivity.kt - Declare a property
deadlineAdapter = DeadlineAdapter() - Set up the
recyclerView:adapter = deadlineAdapter- We want the views stacked vertically, the Linear Layout Manager does this by default:
layoutManager = LinearLayoutManager(context)
- Add some deadlines to our adapter!
- I’m lazy, so I made an extra constructor in our
Deadlineclass:``` constructor(title: String, month: Int, date: Int) : this(title, Date()) { this.date.month = month - 1 // Date does 0-indexing on month numbers… this.date.date = date // …but not on day of month this.date.hours = 23 this.date.minutes = 0 } - If you happen to take the same courses as me, here are some deadlines you can use:```
val now = Date()
deadlineAdapter.items = listOf(
Deadline(“Android-workshop”, 4, 18),
Deadline(“Cogito-kurs”, 4, 24),
Deadline(“DB øving 4”, 4, 14),
Deadline(“PU Sprint 3”, 4, 16),
Deadline(“MMI øving 5”, 4, 30),
Deadline(“SL innlevering 3”, 4, 30),
Deadline(“Eksamen KTN”, 5, 15),
Deadline(“Eksamen SL”, 5, 24),
Deadline(“Eksamen DB”, 5, 30),
Deadline(“Eksamen MMI”, 6, 5)
).filter { it.date.after(now) } // Don’t display expired deadlines
- I’m lazy, so I made an extra constructor in our
Congratulations, you made it to the end of this workshop! 🎉
Now what?
You can try to:
- Sort deadlines by due date.
- Save deadlines in
SharedPreferences. You need to write code to convert the deadlines into strings and then reconstruct them from those strings. An easy way to do so is to use theJsonObject(andJsonArraymaybe) class. - Add a “+” button so users can add new deadlines.
- This button would open a new activity (let’s name it
AddDeadlineActivity), where the user can specify date and title for the deadline. This activity would also save the new deadline inSharedPreferences. - Use an
Intentalong withstartActivityForResult()to open the activity. - Override
onActivityResultto update the items displayed in the recycler view whenAddDeadlineActivitycloses. FromAddDeadlineActivity, you can usesetResult()for indicate whether a deadline was added.
- This button would open a new activity (let’s name it
- Let users delete deadlines by tapping and holding the computer guy image.
- Create an interface containing only one function,
onDeadlineDeleted(deadline:Deadline). - Modify the adapter to take this interface as a constructor parameter.
- Use
setOnLongClickListenerin the code where you set up the view holder, and callonDeadlineDeletedfrom there. - Make
ListActivityimplement the interface somehow, and write code to modify the saved deadlines (and reload the list of course). - Maybe display a dialog to confirm deletion? Try
AlertDialog.Builder
- Create an interface containing only one function,
- Visit the GitHub repo and send pull requests for the code you wrote in these last few steps.